No-Math Measuring for Lettering Placement and even BaselinesAuthor: Kathryn Whitacre Posted: Revised: August 03, 2005 I am self-taught and the methods I am going to describe I have developed through trial and error since I began in 1983. Back when I started I was told to use multiple layers of adhesive shelf paper. Back then I would draw my design and transfer it to the shelf paper with carbon paper, but the quality was lacking as carbon paper is not very detail oriented and the transfer process left a lot to be desired. So I looked for a better resist...and found it in stock used by screen printers for bumper stickers— a 3M product that was 5 Mil. It came in nice large sheets (though the box was very expensive) that I could use on windows, doors, cabinets, etc. I really liked the large size and for large projects drew directly onto the glass after putting on the resist for a crisp image.
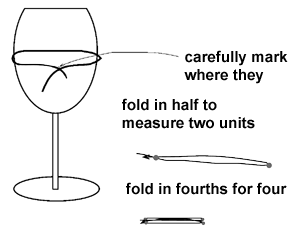
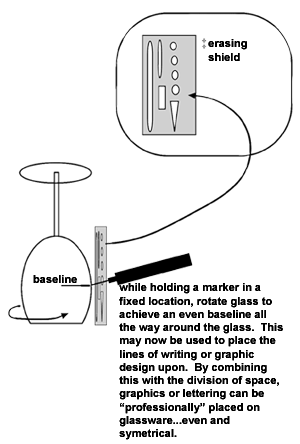
Then in about 1985 Canon came out with the PC25 copier. I ran several tests and all came out great. I could photocopy onto my 3M stock! No more transferring. This way I could reduce or enlarge my image and not have to copy it over. This was a big boon to me. I would use my Macintosh SE30 and typeset lettering or draw graphics or use a copier and manipulate images and then photocopy what I wanted to hand cut onto the resist. I used hundreds of #11 Exacto blades. When the tip broke I threw it away, as I was doing very fine detail and broken tips caused the blade to catch and I didn't want the center of an "e" or "o" to be compromised. I continued with this work manner for many years, but I am getting ahead just a bit. When doing glassware I developed the following method, which I use even now when lettering on glassware or placing design elements on a curved, round or continuous surface. Dividing Space EvenlyWhen wishing to divide a circular shape evenly I do not measure, but rather use a thin (if there is thickness it can compromise the evenness of the division) strip of paper (often tracing paper strips) or a string. I wrap the string/paper around the circumference of the shape and mark where they meet. I then remove the string/paper and make my divisions: fold in half for centering two elements: quarters for four: odd numbers require a bit of working the string/paper until thirds, fifths, sevenths, etc. are achieved. Then mark the folds with a permanent marker on the string/paper. Transfer the marks to the glass by rewrapping the measuring device and carefully noting the measurements. No ruler or math is involved. |
|
©2005 Graydog Services • webmaster: jim(at)graydog(dot)org |