Photoresist – an overviewAuthor: Tony Smith Posted: Revised: August 03, 2005
Publisher's note: Once again, Tony has been kind enough to generate an overview document, based on his experience and point of view. It's an excellent article, and not easy to do, since each of us approaches our work from a different perspective. It's important that we give beginners a broad and consistent view of sandcarving. If you have additional thoughts or information that should be included, please contact Tony or Jim Yount. Photoresist: An Overview This article discusses photoresist in general. Future articles will cover the creation of vector and raster art, and multistage carving using photoresist and vector art. General: Photoresist is a material that is photographically exposed and processed, and used to "resist" a sandblast stream and thereby transfer a pattern to the object being sandblasted. While this definition may be somewhat confusing, an example will make the definition much clearer. The Photographic Process: In a typical, black and white (monochromatic) photographic process, a negative is used to selectively allow light to pass through to light sensitive paper. Where the negative is clear, light will pass directly through, black areas will block light and grey areas will let some light through. After the photo paper is exposed, it is developed in special chemicals. Areas that were exposed to light turn black while areas that were not exposed to light stay white. Grey areas turn various shades of grey depending on the shade of grey in the negative.
Above, you can see the negative image of a church steeple to the left and the resulting positive image on the right. Clear areas in the negative appear white in the image and result in black areas in the positive image. A pure black and white image responds in the same way. For example, the letter "T" would appear as a clear or white area on the negative surrounded by a black border, but the positive image is a black "T" surrounded by a white border as below.
In photography, this same process occurs when the film is exposed and developed, and again when the paper is exposed and developed.
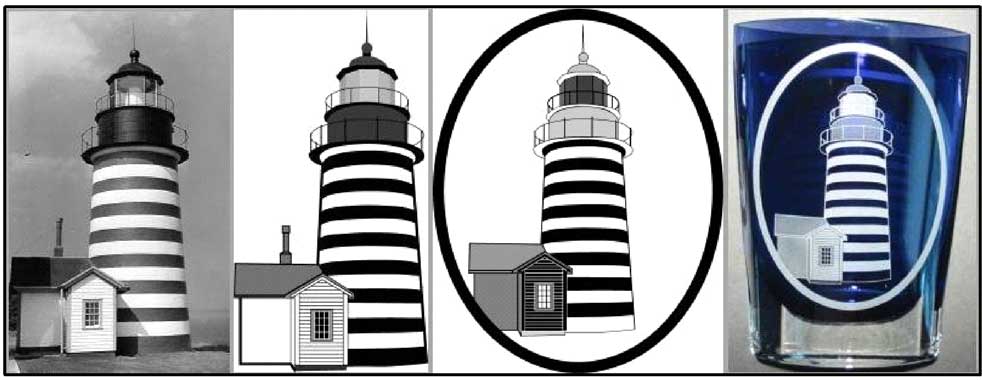
The Image: With photoresist, we usually start with an image on a computer (but a hand-drawn image can also be used). Using photo editing or illustration software, we create either a positive or negative image depending on what areas we want to be blasted, or what photoresist film we are using. For most of the photoresist films available, any black areas in the negative will be open and can be blasted. Remember: Black Is Blast. For typical sandblasting on glass, the sandblasted areas appear white, so we will want to use a Negative image for most sandblasting on glass. If the area that is sandblasted is to be painted, that will need to be taken into consideration when deciding whether to use a negative or positive image. In the above set of images, the photograph at left was the subject of the sandblasting. The second image was created in Adobe Illustrator to try and reproduce the shape as well as capture some of the character of the lighthouse. The third image is the reversed image needed to achieve the correct white-blast on the vase with an added oval border and without the chimney on the building. At right is the finished product. The Film Tool: The image is printed on special paper, called vellum that is transparent to ultraviolet (UV) light, or on a transparency material using a laser printer or an ink jet printer. Ink jet printers require special paper that help produce the solid blacks that are required for properly exposing the photoresist material. Other methods of creating the image include using an image setter (a special laser printer used by the printing industry to create very high resolution (>2000 dpi) images) or lithographic methods using copy cameras and special film. From this point forward, we will refer to the image on vellum or transparency material as the Film Tool. Since we do not consistently use a negative image, it would be confusing to refer to a negative that may really be a positive image. So the term Film Tool will have to do. Exposure: When photoresist is exposed to UV light, the material hardens and becomes water-resistant. Clear areas in the image allow UV light to pass through to the photoresist. So clear areas will harden when exposed to UV light and will not wash away during development. Black areas in the image will block the UV light and prevent it from reaching the photoresist material. Since areas that are not exposed to UV light are not hardened, they will wash away during development. The areas that wash away allow the sandblasting stream to contact the material being sandblasted. PhotoBrasive's RapidMask does not require washout and acts differently than all other photoresist materials. With RapidMask, white is blast. The way it works is that any areas that are exposed to UV light become hardened and very brittle. These areas break apart when exposed to the sandblast stream. Exposure is achieved by shining a UV light source through the film tool onto the matte surface of the photoresist, or in the case of RapidMask, onto the smooth plastic side. There is an optimum exposure time for each light source type. This exposure time will need to vary depending on a number of factors: transparency vs vellum, ambient temperature, line voltage and age of the bulb. More sophisticated UV light sources have built-in devices called integrators which measure the light as it is being emitted by the bulb and stop the exposure when sufficient light has been produced.
RapidMask is unique among the various photoresist materials in that it shows the latent image of the film tool after proper exposure. Areas properly exposed to UV become a solid, dark blue color while unexposed areas remain green. UV exposure sources include fluorescent lamps, mercury
vapor, metal halide and sunlight. The most common source for small-shop use is
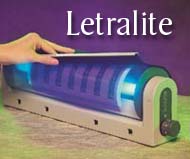
the Letralite, a 25 watt, UV, fluorescent lamp with an attached cylindrical
surface where the film tool and photoresist material can be placed for exposure.
A rubber blanket covers the photoresist and film
The large, commercial UV exposure units typically include a vacuum frame that is comprised of a plate glass window and a flexible rubber blanket that is attached to a vacuum pump. When the film tool and photoresist material are placed between the two, and the vacuum pump is turned on, the vacuum pulls the flexible rubber blanket against the photoresist and film tool and hold them in very close contact. By evacuating the air between the film tool and the photoresist, the closest possible contact is achieved. The commercial equipment use lamps rated from 1000 Watts and up. They produce an intense light with a large amount of UV. Special precautions should be taken to prevent eye damage from the high intensity UV light. Polycarbonate safety glasses block almost all UV light by the nature of the material. UV blocking glasses that also block visible light may be required if the intense white light causes discomfort. Photoresist Exposure Problems: Excessive exposure can cause light to pass through the black areas of the film tool and will make washout difficult due to some hardening from the light leakage. Insufficient exposure will not harden the exposed areas enough, and the entire photoresist may wash out prematurely. Adjusting the exposure is necessary to achieve clear and efficient washout. Exposure tools are available to help determine the proper exposure. These tools typically include black and white patterns and letters as well as several halftone areas of different density. UV light leaking through solid black areas of the film tool when using RapidMask cause a hardening of minute spots in the middle of the unexposed area. This results in an overspray appearance on the sandblasted surface. Washout: In order to properly wash away the unexposed areas, warm water (~100°F) must be used at a relatively high pressure. Special, handheld water nozzles are sold by the manufacturers of photoresist and connect to a standard faucet. The nozzles concentrate the stream of water to produce the high water force required for adequate washout. For fine detail, sandcarvers can use homeowner style pressure washers to decrease washout time and improve tack on self adhesive resists. Commercial washout units are also available for unattended washouts. RapidMask does not require a washout. Drying: The photoresist material must be dried immediately after washout to prevent further softening and swelling from the surface water. A hair dryer works well for small amounts of photoresist. Commercial drying cabinets with hangers or wire shelves are also available for unattended drying. Rayzist recommends blotting up the surface water before drying. The hair dryer can be used for the first few minutes to start the drying process. Complete drying in normal room air can take an hour. Applying the Photoresist: There are two leading manufacturers of photoresist in the United States. One of the manufacturers, Photobrasive, manufactures several types of photoresist. Two versions; UltraPro and RapidMask are self-adhesive and do not require the application of a separate adhesive. Their other offerings as well as that of Rayzist and others require the application of a separate adhesive. Adhesive can be applied to either the photoresist or to the object being sandblasted, but in either case, the adhesive must be applied in a very thin and uniform coating or it will act as a resist itself, preventing accurate sandblasting. In most cases, a single drop of adhesive applied with a foam brush will cover an area approximately 4" x 4". Alternatively, many sandcarvers prefer to spray the adhesive, since it produces much more even coverage. The glue must dry for several minutes before the resist can be applied. (Note that RapidMask is also available through Cooper Graphics of Holly Springs, NC) When applying the resist to the glued surface, or when applying pre-glued resist to the article to be sandblasted, pre-positioning the resist is very important. Alignment marks placed on the object to be sandblasted help to visually align the resist before making contact with the surface. Some pre-glued resists have a very sticky adhesive and cannot be repositioned once the glue has made contact with the surface; PhotoBrasive's Ultra Pro Blue, however, is repositionable. With RapidMask, the cover sheet must be removed to expose the adhesive. Many different techniques can be used to make initial contact with the surface, but bending the resist up at the sides so it makes a vertical line contact at the center seems to work best. Once line contact has been made, apply pressure with a burnisher or with your fingers along the line of contact, followed by pressure from the center toward the outside edges. Working toward the edge from the center will help prevent bubbles from becoming trapped in the middle of the resist. Bubbles tend to break open when hit with the sandblast stream resulting in areas being blasted unintentionally. When the entire resist has been burnished into the glue or onto the surface, the glue must be allowed to set up for several minutes before blasting. This will reduce any chance of blow-off or edge lifting from the sandblast stream. If you are careful, the cover sheet of film can now be removed. If the resist starts to lift off the glue, press the resist down and apply pressure with your fingers or thumb for a moment before trying to lift the cover sheet again. Sometimes lifting a corner with a piece of tape will facilitate removal of a stubborn cover sheet. Mask the surface of the object with masking tape. Overlap each layer of tape by at least 1/8" to ensure the sandblast stream does not lift the edge of the tape. Make sure the tape overlaps the edge of the photoresist by at least 1/8" without blocking areas of the design. If mirror is being blasted from the back, mask the entire front surface of the mirror (the glass surface) with a single piece of contact paper or vinyl resist. This will prevent surface scratches from handling the mirror in the sandblast cabinet. Overlap the vinyl resist with masking tape to prevent the edge of the vinyl from lifting. After masking, inspect the entire object looking for openings, gaps and otherwise exposed areas of the object. Cover any exposed or questionable areas with another piece of masking tape. The blue, painter's masking tape works very well for sandblast masking. The adhesive leaves no residue, even after several days, and is water soluble, so the masking tape virtually falls off after being soaked in warm water. Blasting: Set the pressure pot to approximately 20 psi for blasting the photoresist. From several inches away, blast the surface using an even, scanning motion. Watch carefully for changes in the appearance of the resist. Some of the films have a thin membrane that blasts off first. This is usually followed by a change in the color, texture or reflectance of the object surface that can be seen through the openings in the photoresist. Concentrating the blast stream on one area for too long or just blasting for too long can cause erosion of the edges of the photoresist and sandblasting of unintended areas. Most photoresist is only 0.003" to 0.005" thick, and while the material is tough, it still erodes faster than hand-cut resist. If you notice a mottled surface, you are probably eroding through solid areas of the photoresist. Washup: When done sandblasting, remove the part from the cabinet and inspect under a bright light. If there are any areas that were missed, they must be re-blasted before the photoresist is removed. Wash the surface thoroughly with running water making sure to rinse off any abrasive that might be stuck to the photoresist or masking tape. Remove the masking tape and pull as much of the photoresist off as possible. Dispose of the tape and photoresist in a trashcan. While most of the photoresist materials are biodegradable, an effort should be made to minimize the amount of material that gets washed down the drain. The RapidMask requires special procedures for cleanup. This film is not particularly water-soluble and must be soaked in a strong base solution (pH of 9 or 10) to break it down. Soak the RapidMask in a hot soda ash/water or sodium hydroxide/water solution for 15 minutes until the resist starts to lift off the surface. An alternative method is to expose the resist to UV light for a moment, which will harden the resist. It can then be scraped off with a razor blade. Care must be exercised when using mirror, as this method will scratch the mirrored back surface. Also, the razor blade will drag with it any abrasive that is stuck to the edge of the resist and will scratch the surface of your object. After washing off all tape and photoresist adhesive residue, dry your part with a soft cloth or paper towels. Discussion: Since there are a variety of photoresist materials available, it may take some time before you find a material and process combination that you are comfortable with. Some of the resists work well with flat objects, and some will work with double curves. Some are sensitive to stray UV light from fluorescent bulbs and should be handled in a near darkroom environment, and some can tolerate fluorescent lamps for many minutes without being affected. All of the photoresist materials become desensitized to UV light after washout except for RapidMask which is always sensitive to UV light: even during blasting. UV lamps degrade over time and from non-use. After a long period of non-use, a lamp can sometimes be revitalized by letting it run for a couple hours. This vaporizes and redistributes the mercury inside the fluorescent lamp. Troubles in washout can be from insufficient water pressure or water that isn't hot enough. Other problems arise when washing out near a window or outside during the day (while the resist is still sensitive to UV light). The UltraPro resist is pre-glued and must be handled with care during drying since the surface that is being dried is very sticky. ImagePro Red is moisture resistant and, as a result, doesn't stick to glue very well. Rayzist's SR2000 is somewhat tacky in humid weather and when the film isn't completely dry and will stick to itself if two pieces inadvertently bump into one another during the drying process or when handling after drying. Teflon separator paper should be used when handling any of the resist materials after drying. Most of the resist materials can be used indefinitely after development except for the RapidMask which will degrade over time and the UltraPro which loses its "stickiness" over time. Suppliers: Etchmaster – Norm Dobbins – Articles, books, classes, precut stencils. 505-473-9203 – www.etchmaster.com GlaStar – Sandblasting systems, pressure pots, sandblasting cabinets, nozzles, footswitch control. 818-341-0301 – www.glastar.com McMaster Carr – Industrial supply – air hose, gauges, valves, fittings, connectors, hard-to-find supplies – www.mcmaster.com Northern Tool – Sandblast cabinets, portable blasters, import pressure pots, import siphon feed units. 800-533-5545 – northerntool.com (no www before it) Photobrasive – Photoresist materials, tools and supplies. 218-628-2002 www.photobrasive.com Rayzist - Photoresist materials, tools and supplies. 800-729-9478 - www.rayzist.com TP Tools – Sandblast cabinets, siphon blasters, sandblasting gloves, parts for making your own sandblast cabinet - 800-321-9260 – www.tptools.com
|
|
©2005 Graydog Services • webmaster: jim(at)graydog(dot)org |