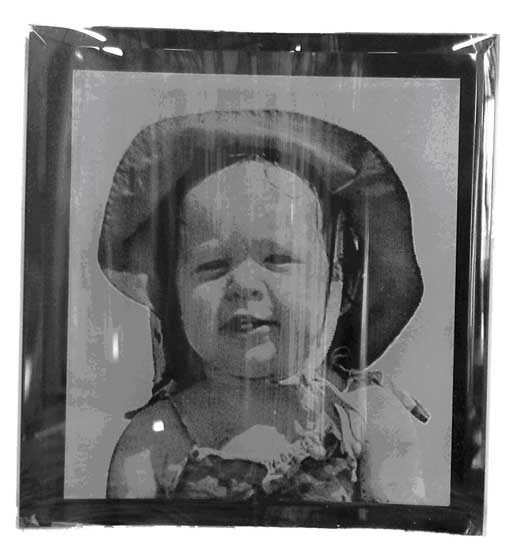
Halftones

Author: Gary Williams
Revised: December 20, 2005

This is a post from Gary Williams, Willis, Texas, on the Cutting Edge Forum, in response to questions on a very nicely done half-tone etching.   It is shown at the bottom of the document.   Gary gave us some good information on his own personal experience with half-tones. This is posted with Gary’s permission.   - Irene 

 I see that many of you had questions regarding the process I used to do the glass. I will refer you to Photobrasive’s Technical Tips and Articles at http://photobrasive.com/techarts.html.  It is loaded with tips and articles regarding this process.  With that said....that is the easy part.  Converting your photos to halftone is very simple.... just follow the steps.  I use RapidMask HD 4 mil. For very fine etchings you will need their 2 mil version. They also recommend grit of 220 or higher when using the 2 mil RapidMask.  You will also need a Letralite system to expose the film.  After exposing the resist you will place it on your glass.  I use the wet method of spraying water on both the glass and the resist before applying it to the glass. It's much easier to position the resist that way.  Just make sure you squeegee all the water from under the resist.  This will also help eliminate air bubbles which, if left, will cause those areas to blow out during the blasting process. Let the resist dry for approximately 15 minutes before you blast.

After all that is done, the fun part begins; albeit, the trickiest part.  I'm referring to the actual blasting.  This is the most difficult aspect of the entire process.  You have to be very patient at this point…..DO NOT RUSH IT.  This type of blasting is totally different than your normal blasting.  If you try to rush it you are going to blast holes in the resist and ruin your piece.  You have to go very slow and keep the nozzle moving.  DO NOT let the nozzle stay in one place.  Blasting was the part that took me the longest to learn.  I liken it to developing the photo on the glass.  I really can't explain this part...it is all done by feel...for me anyway.  Once you get it you will know what I mean.  I would have to show you for you to understand what I am trying to describe here.

What you will see though is this.  As you SLOWLY move your nozzle over the area you are developing you will begin to see the dark blue areas of your photo begin to disappear.  This may take up to half an hour.  The solid area will blast away first so don't spend as much time on those areas during the initial blasting.  Once the resist begins to erode you will find that the process will begin to speed up.  ALWAYS ALWAYS  keep the nozzle moving until all the dark blue resist is removed.  If done correctly you will have a very nice etching when you remove the remaining resist.  You may have to do 2-3 etchings before you get a warm and comfy feeling with the process.

I hope this gives you a better idea of how the process is done.  Read the material provided by Photobrasive and you will have a much better understanding of the entire process.

I hope I did not thoroughly confuse you with my rambling. If you have any specific questions please let me know.


  ©2005 Graydog Services  •  webmaster:  jim(at)graydog(dot)org


| Graydog Glass | Sandcarver | Contents | Contributors | Forum | Photos | Cutting Edge