Pacific Northwest Sand CarversWorkshop - October 2002Compiled by: Irene D'Aloisio and Jim Yount, with additional input from Kathryn Whitacre Revised: August 03, 2005
The Pacific Northwest Sand Carvers met October 18, 19 and 20 in Richland Washington, for a workshop on Multistage Carving using Vector Art and PhotoResist.
Want to join us? If you live in the Pacific Northwest, and would like to be a part of an active and growing sandcarving group, just contact Irene D'Aloisio. You'll find her most current e mail address on the Contributors page.
Those Attending: Paul Barron and Angie Partolan - Anacortes, Washington Kathryn Whitacre - Tacoma, Washington Jules Maloney - Williams, Oregon Jim Simmons - Cornelius, Oregon Diana Evans - Klamath Falls, Oregon Irene D'Aloisio - Edmonds, Washington Gregg and Jane Goett - Everett, Washington Jim Yount and Mary Anne Lauby - Richland, Washington Sandy Drury - Yakima, Washington Colleen Vearrier - Yakima, Washington
Most of the team members arrived Friday evening, and had a chance to tour Jim and Mary Anne's studio, and check out the facilities and equipment that would be in use for the weekend. They use Illustrator for vector art, and have three workstations available for simultaneous work. A high-end 1200 dpi LaserJet 5000 graphics printer with Postscript was used to print vellum, using HiRes Solutions 4 mil film. Exposure process used a nuArc vacuum frame, with high pressure (1500 psi) washout, and drying with Irene's food dehydrator (worked great!). The choke point for a group this size is blasting, with only a single blast cabinet. The cabinet has two separate pressure pot systems, one with footswitch, one using a Pickard type gun, specially modified by Jim, for zero force when open.
A general outline for the weekend was presented by Jim Saturday morning. We identified individual goals for the weekend, then reviewed the list, and identified areas of particular interest to the team members, since we'd need about a week to do it all with any depth. You can read the outline here.
We were fortunate to have resist supplied by both PhotoBrasive Systems and Rayzist. PhotoBrasive supplied enough of their new 4 mil UltraPro Blue for everyone to test the product, and to blast new art. We started with their product, primarily because it had just been introduced, and we were curious about its performance. Later, we'll run similar tests on the Rayzist products and share the results. A hearty thanks! to Robert at PhotoBrasive and Art at Rayzist for their support!
We were given our assignments for the weekend: we divided into three teams, and tackled two missions:
First, we were to evaluate Photobrasive's new 4 mil self adhesive film, using a multistage rose design that Jim had created. All teams exposed, washed out, and blasted their multistage rose.
Second, each team was to select and develop vector art using Illustrator. As time permitted, the design could be carved, or taken home for exploration and learning this Winter. One team was able to complete the design, and take the first piece all the way through blasting, with beautiful results.
In general, this team showed incredible energy and interest. The team left Jim's house at 10:30 PM on Saturday, and then talked until 2AM back at the hotel! Many participants commented that they were "so wound up Saturday night that sleep was nearly impossible".
We were all so busy, that we short changed the "show and tell" aspects of the weekend; we need to do better here next time. Jim Simmons brought beautiful colored glass; Jules showed fine hand-cut resist pieces; Paul and Angie had several of their earlier pieces.
Jim did have time to add two mini demos on Poser (bald naked ladies) and smoothing with diamond burr tools.
Tom Eddleman supplied a half tone series that was very valuable. We did several tests with Tom's images, but didn't quite get the results Tom does (ya' think maybe it takes a little talent to do this?).
Diana Evans brought a Pickard supplied water nozzle that uses compressed air. We hooked it up, but ran out of time to do specific tests against the other two nozzles in Jim's darkroom.
Results
Evaluation of Photobrasive's new 4 mil UltraPro Blue Self Adhesive Resist
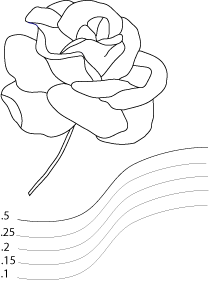
We used the test multistage rose below to evaluate the film. The rose itself is outlined in fat 0.75 point lines; the lines below range from 0.5 point (0.007 inches) to 0.1 point (0.0014 inches). We evaluated this product based on no prejudice for or against the manufacturer (team members use both Photobrasive and Rayzist products). We felt the product's introduction was timely (coming just about the time of the workshop). We will do a similar evaluation of Rayzist products, and compare the results. Tom Eddleman was kind enough to use the same art, and prepare a Rayzist resist, but as Tom points out, it is not a fair test, since he didn't use a graphics laser and vacuum frame in the preparation of his sample.
The manufacturer promises resolution of images to be as good with the 4 mil, as with its 3 mil products, and our tests bear this out, with 0.15 point lines (0.0021 inches) imaging clearly, and at the proper size; the 0.10 (0.0014 inch) lines were starting to show some raggedness, being about 90-95% complete. This was surprisingly good, since it is difficult to image lines thinner than the resist is thick. Typically, in past tests all lines have imaged, but very thin lines tend to image fatter than they are drawn on the vellum, once line width gets smaller than resist thickness. In addition, the product produces nice clean pulls of multistage pieces, much like the manufacturer's 5 mil product, and is more repositionable than previous products. It is, however, a different product, and requires care in exposure (same times as the 3 mil) and in particular in washout and drying.
Blasting very fine lines is always a tradeoff, with longer wash times required for the finest lines, in turn pushing the limits on maintaining tack, even with high pressure washout systems.
Two findings need emphasis: while the carrier and slip sheets separate very nicely from the resist, they can be tricky to initially separate. "Flipping" or "thunking" the edge of the resist with your fingers can help get the slip sheet started. We had two near disasters pulling the carrier sheet off, once the resist was mounted to the glass. This after near-perfect tests on the same product during the week prior to the test. So, what was different during the workshop? Humidity was much higher due to many more pieces of resist being processed. We then dried the next trials in a food dehydrator for about an hour at 105 degrees, and had absolutely no problems. We also had two blow outs Sunday on very, very fine sections. Greg wondered if longer times would improve the resist to glass bond. Checking in with technical support at Photobrasive indicated that Greg's thoughts were right on target: an overnight "curing" of the resist to glass would improve the bond in extreme cases, where we are pushing the capability of the product to its limits.
We have yet to test the product for use as a second resist; the concern here is to make sure that the resist conforms to the blasted glass as well as 3 mil, and has as good a tack.
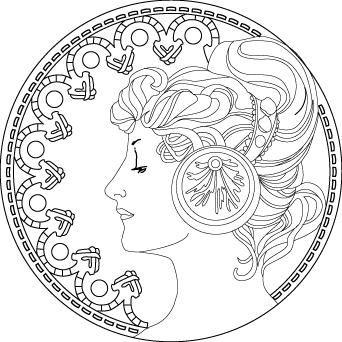
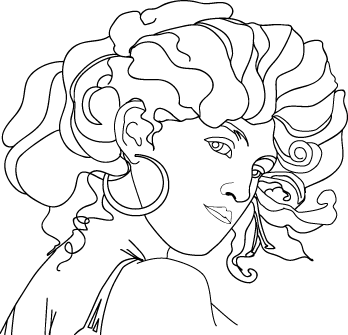
New Art - "Team Cool"
Greg, Angie, and Sandi produced this beautiful piece, based on a public-domain Mucha image. Special mention should go to Angie, our left handed Mac user, for doing most of the art on a right handed PC. What a trooper! Greg and Angie were able to get an initial blast on this piece before the dust collection system destroyed a bearing on Sunday.
New Art - Oregon Team
The Oregon team - Diana, Jim Simmons, and Jules - also based their work on a public domain Mucha graphic. They finished the graphic, but didn't have time to blast.
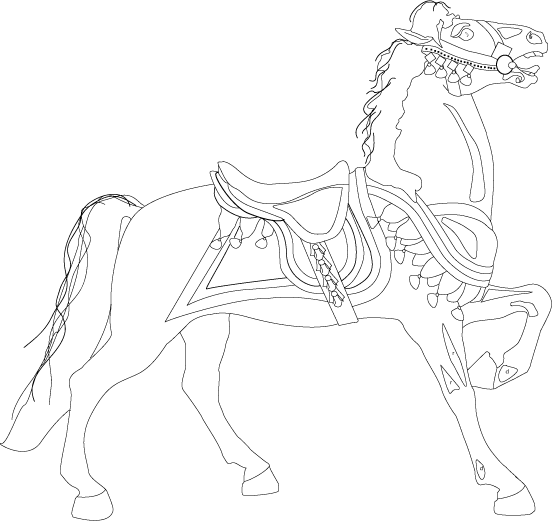
New Art - "Team Cooler"
The remaining team, Irene, Kathryn, Paul and Colleen worked the art and blasting strategy on this piece. They will use the Pickard liquid resist method to create texture in the mane and tail.
Kathryn's Comments:
Working in another application was mind expanding. Illustrator was very similar to Freehand and if I had a more current version of Freehand, I'm sure I could directly import the Illustrator document. Some commands were a bit different and I was especially smitten with the key board shortcuts that Jim had on his computer. I plan to set up my own and hopefully they'll help me work faster and easier. Sometime using someone else's set up can frustrate, but it can also open doors not yet discovered. So I encourage everyone to try the shortcuts...they really speed up work and make things simple. I was also impressed with the amount of memory in the computer. I have about 512, but I see that over 1GB is probably VERY beneficial. If there is one credo out there for graphic users on computers it is "you can never have too much memory". The actual blasting was quite short as we shared work stations and then the bearing went out; but what I discovered was how much I hate my blast gun. I want a light weight gun with maximum control. I am working towards that. I am grateful for someone pointing the way. I like the edge lighting that Jim uses on his pieces. I think that shows the work at its best. I can't say enough about the group. Generous people with a lot of knowledge to share. Everything about the weekend was superlative... and after awhile all superlatives seem ordinary, but it was anything but!!! Kathryn Next Time
We have tentatively decided to meet again in six months in Richland, focusing on a variety of topics including blasting strategy for multistage contour carving.
|
|
©2005 Graydog Services • webmaster: jim(at)graydog(dot)org |