Fine Details Using Simple Tools in Adobe IllustratorAuthor: Jim Yount Posted: Revised: August 03, 2005
This is the first in what I hope will be a series on using Adobe Illustrator tools to enhance the quality of vector art for multistage glass carving. Corel Draw users: I haven't tried these in Corel, but every time I use Corel, I am impressed by the depth and sophistication of that package. Give it a try, and let me know how you do. I'm lucky to have a better half who is a professional graphics designer. Mary Anne points out that there are some simple techniques in Illustrator that can simplify art generation and add a detail look to the piece, without complicating the blasting process. The following note describes generating your own pattern brushes, and using clipping masks to add texture to small places. Current project: I am interpreting Mucha's "La Plume" for use in a doorway in our house. Dover has a release in its Mucha publication, granting use of this image.
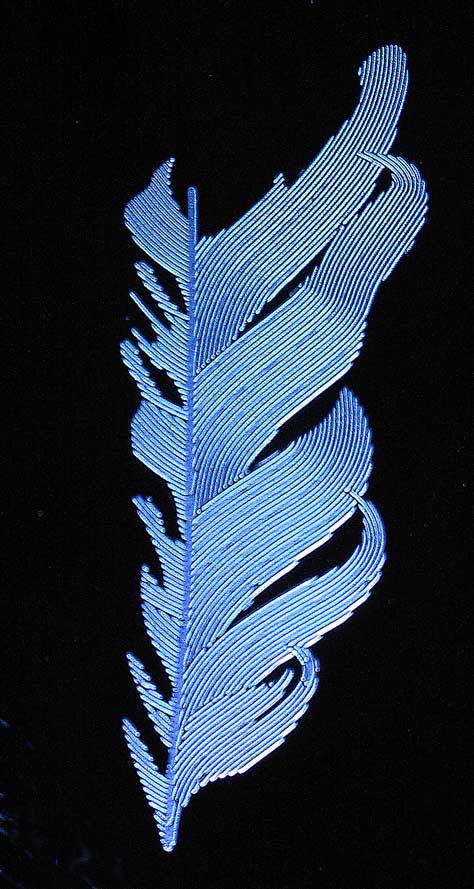
I'll post more images after I carve this piece, but mainly, I started with the great vector art of the face done by Angie and Greg at our fall workshop here in Richland. I've added the body, and a fair level of detail, and changed the fabric in the dress so that the folds of cloth can be very deeply carved. One version of the art will be done on a 6x10 inch blank, and edge lit from the left hand side. I wanted to put some texture in the feather/pen, and considered using Bob Pickard's liquid resist. However, that part of the piece is very small and delicate and demanded fine detail (the overall height of the feather is about 2 1/2 inches). The photo below (click to enlarge) shows the test result for the feather. The piece was blasted using UltraPro Blue 4 mil, and is shown lit by Jim Dowler's bright white lights, which give the work a beautiful white/blue glow, even with jade glass. For some reason, the lines in the photo below appear broken when the photo is published on the web (maybe due to low resolution). On the original photo, they appear smooth and continuous. Oh, well, someday I'll figure that one out...
It seems this technique could be applied in many ways to create texture in small areas, for example: hair, fabric etc, depending on the pattern chosen. Technical details:Notice that the sections of the feather overlap. I drew each section individually (six in all - the left side is all one section), then drew one simple curvy line through the center of each section on the right, several on the left. These lines set the direction of the texture lines in the feather. I set the line weight at 1 point, so that the pattern would reproduce at full size, then stroked the line with a pattern I made of about 65 alternating black and white lines. By using the white lines, any overlapped art would not show through. The most successful patterns used 1/2 point black and white lines, 0.007 inches apart. I then used a clipping mask to cut away the lines that were outside the feather sections. While this sounds complicated, it is really pretty simple once you get the hang of it. It took about a day to figure it out; new art would take maybe 30 minutes to do once the skill is learned. Generating patterns in Illustrator is pretty simple. You draw the pattern you want, then drag it onto the Brush Pallet. So, in this case, I drew one perfectly horizontal line (hold down the shift key while drawing). Copy and paste the line, to create additional lines, align and distribute the lines at 0.007 inches; select the group, and drag it onto the brush pallet. Now just draw a curvy line, and stoke it with the new pattern you just made. Presto! A ribbon of lines appears, following the curve you just drew. Put the ribbon on a layer underneath the feather section, select both the section and the ribbon, and press control 7 to "cookie cutter" the section of ribbon you want. I use a vacuum press. If you use a Letralite, you may have difficulties with the finer lines. Software: Illustrator 10 Printer: HP Laserjet 5000, Postscript level 2 Vellum: High Res Polyester Laser Imaging Film, 4 mil Resist: UltraPro Blue 4 mil Exposure: nuArc vacuum frame, 120 seconds with 1000w Quartz at 40 inches Wash: 1700 psi, 28 seconds at 105 degrees F Dry: 30 minutes at 105 degrees, Excalibur food dehydrator Cure: Overnight to set bond with glass substrate Blast: 24 psi pressure pot, 220 grit SiC, at 8 inches (very gentle and gradual) for maybe a minute
|
|
©2005 Graydog Services • webmaster: jim(at)graydog(dot)org |