Sandcarving Glass Through and Through
Author: Tom Eddleman
Published:
Revised:
April 04, 2005
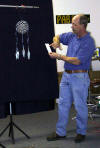 This is an exercise in carving a pattern completely through
the glass substrate that encompasses the different aspects of the process.
Blasting all the way through is used to cut out pieces of float glass, etc. and
to cut out a design or sections of the main body. The designs to choose from are
endless and the process is very pleasing to the eye. About the only drawback is
that it is very time consuming. If your customers can't appreciate that then
they probably won't be willing to pay what it's worth. Those that can will pay
for the end result.
This is an exercise in carving a pattern completely through
the glass substrate that encompasses the different aspects of the process.
Blasting all the way through is used to cut out pieces of float glass, etc. and
to cut out a design or sections of the main body. The designs to choose from are
endless and the process is very pleasing to the eye. About the only drawback is
that it is very time consuming. If your customers can't appreciate that then
they probably won't be willing to pay what it's worth. Those that can will pay
for the end result.
Once you have come up with a suitable design that lends
itself favorably to the process you will have to decide on a substrate.
Probably the first choice is float glass as it's cheap and easy to get. It's
also the easiest to use. Many things can be used for the substrate - marble
tile, bottles, stained glass, wood, HDU, etc. The list goes on, but for now
we'll deal with float glass.
For resist you want something durable or heavy duty.
Rubber, vinyl, or permanent metal stencils can be used.
I tend to shy away from photo resist in all but the heavier
mils for this project. Once the initial cutout has been done the photo resist
works well for the secondary etching. If you're using a vinyl cutter and the
weeding of that vinyl is not too delicate then just leave it on and weed it.
Otherwise you can reapply photo resist.
After cleaning the substrate and applying the resist to one
side the other side must have resist applied to it. After applying the resist
from the first side the resist on the other side has to be indexed with the
first resist. This is very important to get a clean, straight cut. The reason
for this is that we're going to blast half way through each side and meet in the
middle. You can blast all the way through from one side to a resist on the
other side (you risk blasting under the resist on the other side and ruining the
job), or you can blast through to no resist on the back and risk frosting the
back side. In the case of blasting bottles unless you're willing to coat the
inside of the bottle with a removable resist it'll be frosted on the inside when
you're finished.
With most of the indexing that's done a light table is
invaluable. Taping the piece to a window or door with light behind it will work,
but a light table is much easier. With the first resist on the bottom position
the matching reversed piece on the top side. With some designs you can get it
straight by just eyeballing it. On some designs you will need to position it and
make a paper or tape hinge to get it straight. Most of the time that is what I
do as it works better for me. Just a few thousandths of an inch off is
noticeable.
Once all the resist is in place and what needs masked is
protected it's time to blast. This is probably the easiest part of the job. It
may also be the most boring as it doesn't take a lot of skill and it takes a lot
of time. Use a small orifice nozzle and blast at a fairly low pressure. For
double strength window glass I like a 1/16" nozzle at 20 lbs. using 180 grit
silicon carbide.
Keeping the blast area just barely off the resist and
holding the nozzle at a 90 degree angle to the glass blast at a distance of
about 4 inches. By holding it close, using a small orifice nozzle and not
blasting on the resist it will take much less air and will also take less time
to blast it. Another bonus is that you will not ruin the resist and the
substrate.
 If you have several pieces to do or a large piece with
multiple parts go around each piece once and move on to the next one. When all
have been done the first time repeat what you just did on the front side on the
back side. Then start again on the front side. Do this over and over until the
pieces have fallen out. Never go back over a piece. The idea is that by
blasting in order over and over again the resist never has a chance to heat up.
If it does you'll have "resist failure" or more aptly named "glue failure". If
you have a design with a piece in it that has a small finger protruding from it
like a quill on a feather try to get the quill part completely cut out before
the main body is cut out. If you don't and the main body gets free first it may
just break the design on the thin portion as it falls out.
If you have several pieces to do or a large piece with
multiple parts go around each piece once and move on to the next one. When all
have been done the first time repeat what you just did on the front side on the
back side. Then start again on the front side. Do this over and over until the
pieces have fallen out. Never go back over a piece. The idea is that by
blasting in order over and over again the resist never has a chance to heat up.
If it does you'll have "resist failure" or more aptly named "glue failure". If
you have a design with a piece in it that has a small finger protruding from it
like a quill on a feather try to get the quill part completely cut out before
the main body is cut out. If you don't and the main body gets free first it may
just break the design on the thin portion as it falls out.
When all the pieces have been cut out go back over the
edges and smooth them up. At this point if you have more parts of the design
that need weeding and blasting do that and you're finished.
 This is an exercise in carving a pattern completely through
the glass substrate that encompasses the different aspects of the process.
Blasting all the way through is used to cut out pieces of float glass, etc. and
to cut out a design or sections of the main body. The designs to choose from are
endless and the process is very pleasing to the eye. About the only drawback is
that it is very time consuming. If your customers can't appreciate that then
they probably won't be willing to pay what it's worth. Those that can will pay
for the end result.
This is an exercise in carving a pattern completely through
the glass substrate that encompasses the different aspects of the process.
Blasting all the way through is used to cut out pieces of float glass, etc. and
to cut out a design or sections of the main body. The designs to choose from are
endless and the process is very pleasing to the eye. About the only drawback is
that it is very time consuming. If your customers can't appreciate that then
they probably won't be willing to pay what it's worth. Those that can will pay
for the end result.